Easy Form validation with YUP (+ Formik) in react (For beginners)

Software engineer
We just need 3 things to work, React , Formik & YUP (Obviously). 🤦

I will be assuming that you already setup the react and just looking something for the validating the form.
React Js:
Just incase if you haven't, here is the link to setup the react link. 🔗
Formik:
Setting up the Formik is also dead easy,
just use the NPM or the YARN to install the formik on your project.
npm: npm install formik --save
yarn: yarn add formik
Now we need to setup the form, for that we need the Formik.
We can either useFormik hooks or directly import the Formik.
// by implementing useFormik() hooks
const formik = useFormik({
     initialValues: {},
     onSubmit: values => {}, ...
   });
or directly using the Formik as the form, more classical approach per say,
// using Formik as the Form.
<Formik onSubmit={} initialValues={}>
</Formik>
I will be using the formik hooks for this tutorial, feel free to use whatever you want. Below we have the very simple Form made from the formik.
import React from "react";
import { useFormik } from "formik";

export default function App() {
  const formik = useFormik({
    initialValues: {
      email: ""
    },
    onSubmit: (values) => {
      // simple code
    }
  });
  return (
    <form onSubmit={formik.handleSubmit}>
      <input
        id="email"
        name="email"
        type="email"
        onChange={formik.handleChange}
        value={formik.values.email}
        placeholder="Email"
      />

      <button type="submit">Submit</button>
    </form>
  );
}
Output:

YUP
Finally, lets add the YUP validation on the form.
Installing yup on the project using npm and yarn:
npm install yup or yarn add yup
For the sake of easiness, Let's say we want to add the validation where email must not be empty, or Required validation on email field.
First, import the YUP package where your code is, for me i will import on the code above.
import React from "react";
import { useFormik } from "formik";
// import like this
import * as yup from "yup";
We need the create the validation schema, which is also very simple.
import React from "react";
import { useFormik } from "formik";
// import like this
import * as yup from "yup";

const formSchema = yup.object().shape({
  email: yup.string().required('Required'),
 // This will make sure that the email is string,
 // and value must not be empty.
});
You can put any error message inside the
required("message-to-show-on-error")Now all we have to do is link the yup schema and the formik form
import React from "react"; import { useFormik } from "formik"; // import like this import * as yup from "yup"; const formSchema = yup.object().shape({ email: yup.string().required('Required'), // This will make sure that the email is string, // and value must not be empty. }); export default function App() { const formik = useFormik({ initialValues: { email: "" }, // >>> Link schema here <<< validationSchema: formSchema, onSubmit: (values) => { // simple code } }); return ( <form onSubmit={formik.handleSubmit}> <input id="email" name="email" type="email" onChange={formik.handleChange} value={formik.values.email} placeholder="Email" /> <button type="submit">Submit</button> </form> ); }- Done! thats it, we have included the yup validation with formik. Just a small problem , how would we know if we have the error? Cause right now we don't have any mechanism to display the error message. And my friend, that is also super simple.
Simply add the following code where you want to see the error message, and it will work like charm.<span>{formik.errors.email}</span>
Final code will look something like this 👇
import React from "react";
import { useFormik } from "formik";
import * as yup from "yup";

export default function App() {
  const formSchema = yup.object().shape({
    email: yup.string().required("Required")
  });
  const formik = useFormik({
    initialValues: {
      email: ""
    },
    validationSchema: formSchema,
    onSubmit: (values) => {
      // simple code
      console.log(values);
    }
  });
  return (
    <form onSubmit={formik.handleSubmit}>
      <div>
        <input
          id="email"
          name="email"
          type="email"
          onChange={formik.handleChange}
          value={formik.values.email}
          placeholder="Email"
        />
        <br></br>
        <span>{formik.errors.email}</span>
      </div>

      <button type="submit">Submit</button>
    </form>
  );
}
Output:
With Error
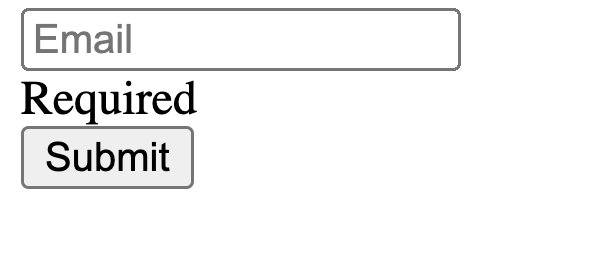
And obviously looks ugly, which can be fixed with simple css/ styling.
Congratulations! 🎉🎉 you have successfully used the formik and yup validation.

Yup is super powerful, we can do all sorts of stuff like:
email: Yup.string().email('Invalid email address').required('Required'),firstName: Yup.string() .max(15, 'Must be 15 characters or less') .required('Required'),
To check if the age is positive number + non emptyage: yup.number().required().positive().integer()
I will leave the example code here: https://codesandbox.io/s/vigilant-lamarr-fhscbj?file=/src/App.js:0-817
Have fun experimenting on it. 👨🔬
Byeeee 👋👋👋👋👋